
7. Output and nest
When the panels are right, put them into Rhino as cutting patterns and nest them on the material. Both are in the drop-down of the Output column of the Atlas.
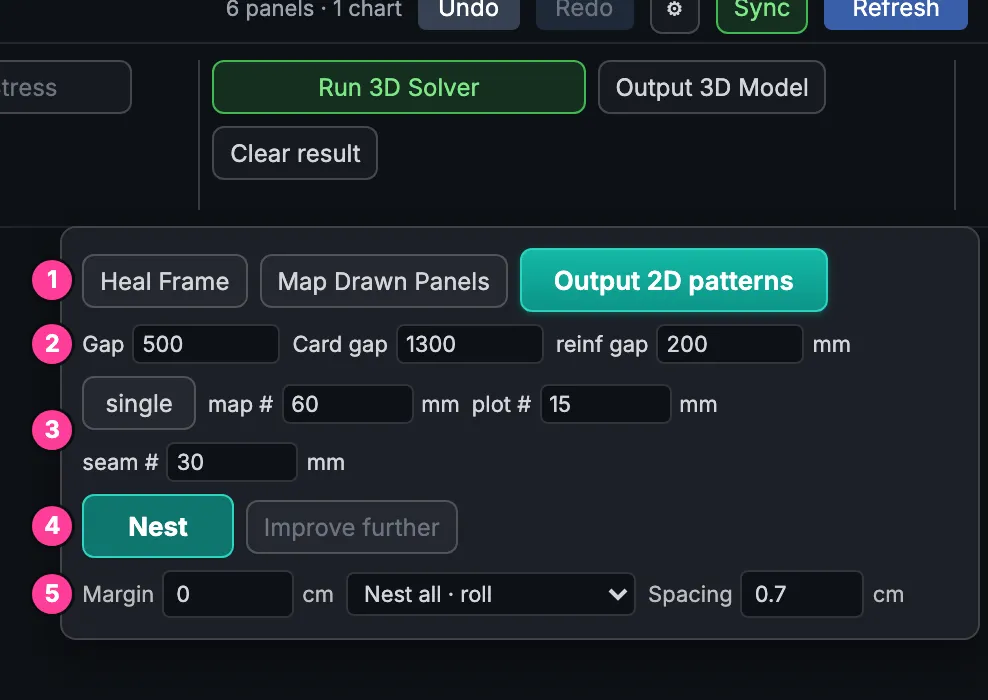
- Heal Frame, Map Drawn Panels, Output 2D patterns. Output 2D patterns draws the flat panels in Rhino.
- Gap, Card gap, reinf gap. Room between panels and between cards on the map; clearance of the reinforcement pieces.
- single / double, map #, plot #, seam #. One or two reinforcement strips; the text heights in the 2D patterns.
- Nest, Improve further. Lay the pieces out on the material.
- Margin, Nest all · roll, Spacing. The nest settings.
Output 2D patterns
Section titled “Output 2D patterns”-
Select the cards to output, or select nothing when the drawing has one wireframe.
-
Rest the pointer on the Output column and click Output 2D patterns.
-
If a panel’s flat shape is approximate, the Atlas asks Bake approximate panels? first. It lists those panels, each with the largest difference between a distance on the panel and on its flat shape, such as
up to 0.8% (2.1 mm). Click OK — Output 2D patterns to go on, or Cancel to solve them first.
The flat panels are drawn in the Rhino document on your output layers: cut lines, pen lines, seam names, notches, numbers and window outlines. A panel that was solved is final. A panel that was not solved is drawn from its preview flattening; the preview is often good enough to cut, and the dialog above tells you when it may not be.
- Each output is a new set. It is the Rhino group
Bake 2Dwith a number, and nothing an earlier output drew is changed or removed. To get rid of an old one, select it withSelGroupand delete it. - The output is grouped so that each Ungroup opens one level: a card, then each panel with its details. Reinforcements and pockets are pieces of their own.
- A seam legend is always drawn, to the left of the patterns: a table of the seam types used, with their descriptions, how many times each is used and their total length. There is no switch for it.
- Settings → Output Layers sets the layer and colour of each kind of line. Settings → General → Output orientation sets whether the patterns are drawn Face down (the default) or Face up. Text is never mirrored.
What the output controls do
Section titled “What the output controls do”| Control | What it does | Default |
|---|---|---|
| map # | Height of the big panel number in the middle of each pattern. Its layer is Map tags. | 60 mm |
| plot # | Height of the plot numbers at a panel’s corner and on each reinforcement. Its layer is Panel numbers. | 15 mm |
| seam # | Height of the seam type names, written outside the cut line. Only seams that are not the profile’s default Seam get one. Its layer is Map tags. | 30 mm |
| reinf gap | Clearance between a panel and its reinforcement pieces. | 200 mm |
| single / double | One reinforcement strip per run, or a second strip one reinf gap further out. Click to switch. | single |
-
Make sure every piece has a material: set the Main material in the Materials column, or a material on the piece itself. See Set the material.
-
Select the cards to nest, or select nothing when the drawing has one wireframe or a card is open. Nest lays out every piece of those cards.
-
Click Nest. The Atlas packs each material’s pieces on its own roll, keeping each piece’s material direction, the usable width of the roll and the spacing. The search takes about 30 seconds in all, shared between the materials. A large percentage shows how far it is, with NESTING below it; the map cannot be changed meanwhile.
-
To stop early, click Cancel — keep best layout: the best layout found so far is kept.
-
The layout is drawn in Rhino.
-
Improve further carries on from the best layout, up to 120 seconds in all. It can be clicked once a fresh nest can still be improved.
While a nest is running, Cancel also shows in the Output drop-down. It stops the nest; the last nest stays.
Nest settings
Section titled “Nest settings”| Control | What it does | Default |
|---|---|---|
| Margin | Held back from the material’s usable width, so a solved or curved seam cannot run off the roll. In cm, or in inches with Imperial units in Settings. | 0 cm |
| Nest all · roll / Available stock | Nest everything on the roll, or fill the stock lengths you have first. | Nest all · roll |
| Spacing | The smallest distance between two cut outlines. In cm, or in inches with Imperial units in Settings. | 0.7 cm |
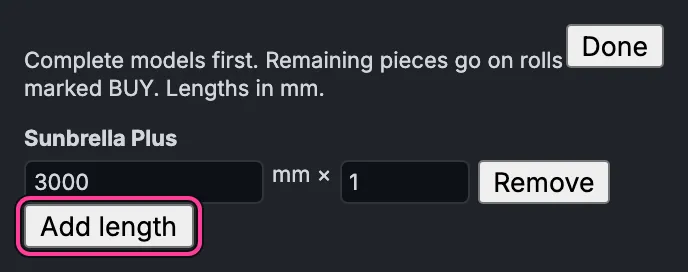
With Available stock chosen, a Stock lengths button appears. It opens a list of your materials. For each one, Add length adds a length of roll you have (3000 mm × 1 to start with): type its length in mm and how many there are, from 1 to 200. Remove takes a length away, Done closes the list. Complete models are nested on your stock first; the pieces that are left go on rolls marked BUY.
Spacing on the map
Section titled “Spacing on the map”Gap and Card gap are in the same drop-down, but they change only the map, not the patterns: Gap is the room between the panels of one wireframe (500 by default; a change respaces them at once), Card gap the room between cards (1300 mm by default), used by the next Re-layout.
Output 2D patterns and nesting need a plan: Pro or a Day Pass. Every tool and the preview work on a free account, but the free preview shows the panel shapes only, without cut lines, notches and labels, and Rhino’s command line says:
[Fabricator] Atlas JS: plan: The free plan shows the panel shapes. Cut lines, notches and labels come with a plan. Choose one under Plan & billing in the Fabricator panel.Without a plan, Output 2D patterns and Nest are refused. Rhino’s
command line shows a support: line saying that full solves, 2D patterns and
nesting need an active plan.
See Plans.
When something is refused
Section titled “When something is refused”The Atlas does not show its warnings over the map. When an output or a nest
is refused, look at Rhino’s command line: Fabricator’s lines there start with
[Fabricator] Atlas JS:. A line starting support: carries a code and a
reference for support.