
The Fabricator panel
The Fabricator panel sits beside the Rhino viewport. This page lists every control on it, in the order they are on screen, as the panel is in Fabricator 2. Every control has hover text: rest the pointer on one to see it. A tour of the screen shows the panel as a whole.
The account row
Section titled “The account row”
- Account. Your first name and plan. Click it for the account menu.
- Atlas. Opens the Atlas, or parks it when it is on screen.
- Settings. Opens the Settings window.
| Control | What it does |
|---|---|
| Account button | Shows your first name and your plan: Free, Pro or Day pass. Before you log in it reads Not logged in; while checking, Checking…; while you log in, Logging in…. Click it for the account menu. Hover shows your email. |
| Atlas (map icon) | Opens the Atlas, as the FAB2D chip does. While the Atlas is on screen the button is blue with a dot, and a click parks the Atlas. |
| Settings (cog) | Opens the Settings window. |
A lapsed plan shows as Free.
The account menu
Section titled “The account menu”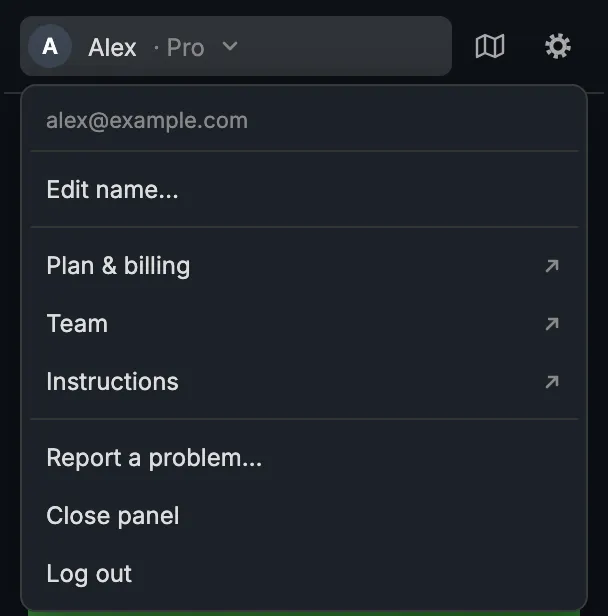
| Item | What it does |
|---|---|
| Your email | Shown only. |
| Edit name… | Changes the name on your Fabricator account, 1 to 80 characters. Enter saves it. |
| Plan & billing | Opens the website’s Billing page in your browser. See Plans. |
| Team | Opens the website’s Team page. See Your team. |
| Instructions | Opens the website’s videos and guides. |
| Report a problem… | Opens a form to write to Fabricator support (below). |
| Log in | Shown when you are not logged in. See Install and log in. |
| Close panel | Parks the panel on the FAB3D chip. |
| Log out | Logs you out on this computer. |
Edit name…, Plan & billing, Team, Instructions and Log out show only while you are logged in.
Report a problem
Section titled “Report a problem”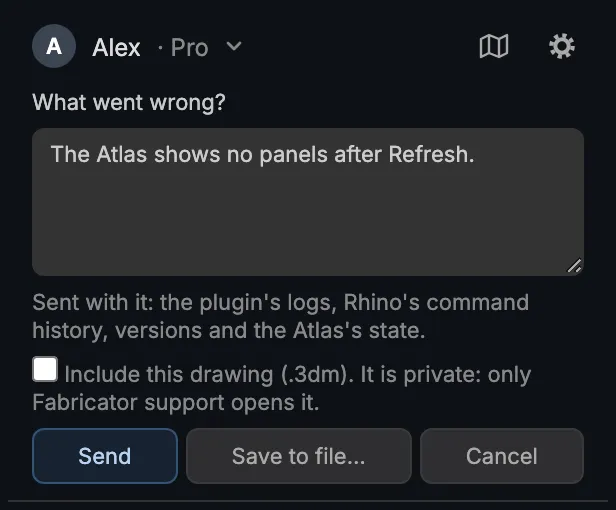
Write what went wrong in the box. The plugin’s logs, Rhino’s command history, the versions and the Atlas’s state go with it.
| Control | What it does |
|---|---|
| Include this drawing (.3dm) | Sends the open drawing too. It is private: only Fabricator support opens it. The box is unticked each time. |
| Send | Sends the report. The answer comes by email. You must be logged in, and your email address confirmed: if it is not, a Verify email button appears. |
| Save to file… | Saves the report and the diagnostics as a .zip, to email to support@fabricator.hr yourself. Works without logging in. |
| Cancel | Closes the form. Esc does the same. |
A report over 25 MB cannot be sent; save it to a file instead. See also Support.
The status line
Section titled “The status line”Under the account row, one line appears when there is something to say, the most pressing first.
| Message | Buttons |
|---|---|
| (none, not logged in) | Log in |
| Opening your browser… / Approve code … in your browser | Cancel |
| You’ve been logged out | Log in |
| Can’t reach the Fabricator server | Try again |
| Fabricator … is available | Update |
| Downloading the update… | — |
| Restart Rhino to finish the update | — |
| Update required to keep working | Update, or Download manually |
| The update didn’t install | Try again, Download manually |
The update messages are explained in Keep Fabricator up to date.
3D Frame
Section titled “3D Frame”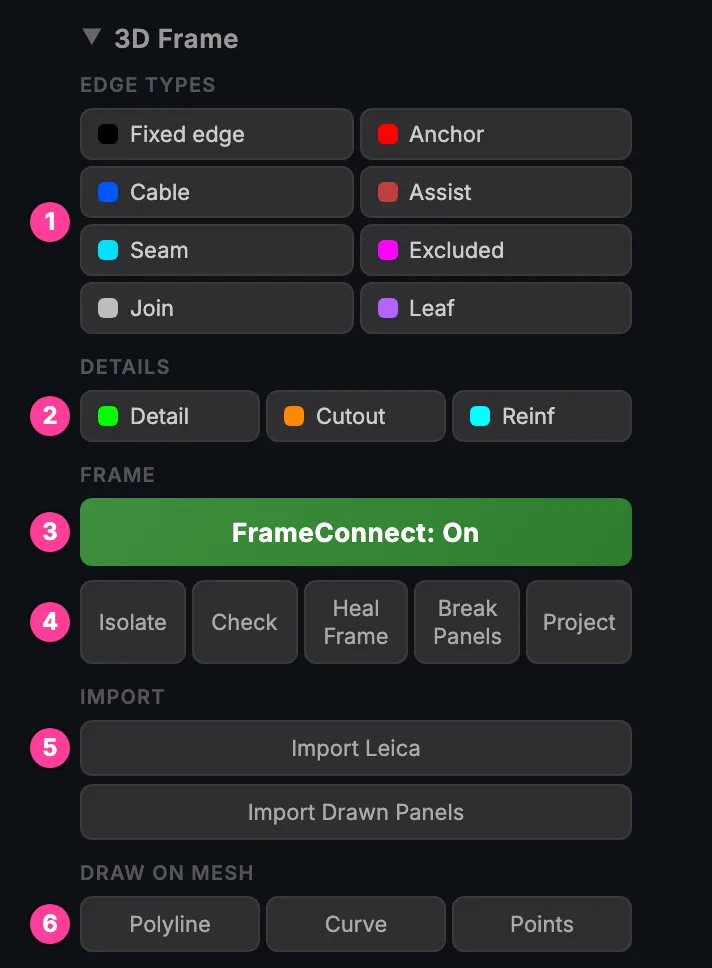
- Edge Types.
- Details.
- FrameConnect.
- Frame tools.
- Import.
- Draw on Mesh.
Click a section’s title to open or close it.
Edge Types
Section titled “Edge Types”Fixed edge, Cable, Seam, Join, Anchor, Assist, Excluded, Leaf. With curves selected, a click puts them on that layer. With nothing selected, it starts a polyline on that layer (Anchor: points). Either way the layer becomes the current layer. What each role means is in Edge types.
Details
Section titled “Details”| Chip | What it does |
|---|---|
| Detail | Draws a detail line on the solved 3D mesh, or puts the selected curves on the Detail layer. |
| Cutout | Draws a cutout outline on the solved 3D mesh, or puts the selected curves on the Cutout layer. A closed shape inside a panel becomes a hole. |
| Reinf | Draws a reinforcement outline on the solved 3D mesh, or puts the selected curves on the Reinforce layer. |
With no solved mesh, they draw in Rhino as usual.
| Control | What it does |
|---|---|
| FrameConnect: On / FrameConnect: Off | Curve ends that meet stay welded together while you edit the frame. Green is on, red is off. The setting is kept for the next Rhino session. Leave it on. |
| Isolate | Hides everything except the Fabricator frame. The button then reads Show All; click it to bring everything back. |
| Check | Marks open ends, near misses and overlaps in the viewport. How near counts as a near miss is the Auto fix distance threshold in Settings. |
| Heal Frame | Snaps microscopic gaps on the selected curves and joins Fixed edge and Join chains. |
| Break Panels | Breaks the selected wireframes, or all of them, into individual panels. One Undo takes it back. |
| Project | Projects the selected curves from the current view onto the wireframe’s faces. The curves you drew are replaced by the projected ones; curves that cross no face stay as drawn. |
Import
Section titled “Import”| Button | What it does |
|---|---|
| Import Leica | Imports a Leica iCON DXF and closes it into a wireframe. See Start from a Leica survey. |
| Import Drawn Panels | Outlines drawn in other software become one card, closed, broken at their corners and put on Fixed edge. Map Drawn Panels then opens in the Atlas. See Start from drawn panels. |
Draw on Mesh
Section titled “Draw on Mesh”Polyline, Curve and Points draw polylines, smooth curves or points on the solved 3D mesh.
3D Solver
Section titled “3D Solver”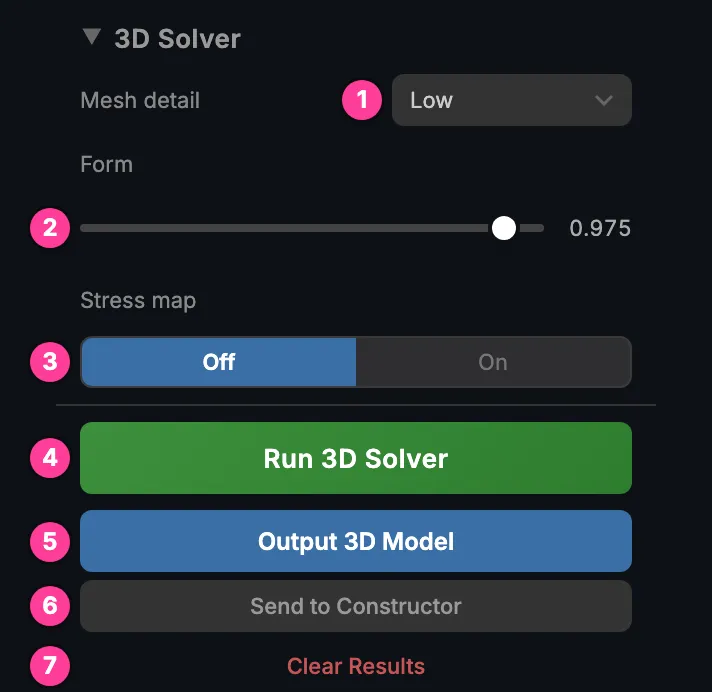
- Mesh detail.
- Form.
- Stress map.
- Run 3D Solver.
- Output 3D Model.
- Send to Constructor.
- Clear Results.
| Control | What it does |
|---|---|
| Mesh detail | How fine the solved mesh is: Very low, Low (the default), Medium, High, Production. Finer takes longer; Production is for final output. |
| Form | How much shape the solver gives the fabric between its edges, from 0.600 to 1.000. The default is 0.975. See Solve in 3D. |
| Stress map | Off / On. Colours the 3D preview by fabric stress. Linked to Stress in the Atlas: either one switches both. |
The action buttons
Section titled “The action buttons”| Button | What it does |
|---|---|
| Run 3D Solver | Solves the wireframes selected in the viewport; a drawing with one wireframe needs no selection. It runs the Atlas’s own solve, so the Atlas is loaded behind its chip if it is not open. The button reads Solving… while it runs. |
| Output 3D Model | Puts the solved 3D mesh of the selected wireframes into the document. With nothing selected, every solved wireframe. |
| Send to Constructor | Sends the selected geometry to the browser editor, if it is open on this computer. It does not open the browser. See The browser editor. |
| Clear Results | Removes the 3D preview and the solver results. Your frame is not changed. |
Materials
Section titled “Materials”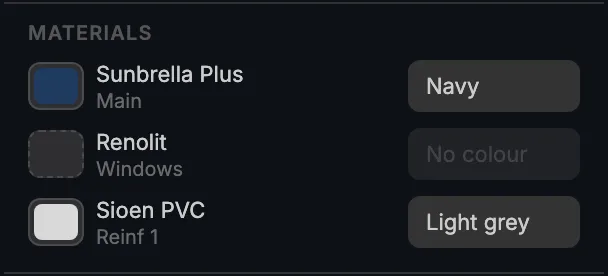
The materials set in the Atlas: the project’s Main and reinforcement materials, and any that a panel or a piece picked for itself. No material is added here; that is done in the Atlas (Set the material).
| Part of a row | What it does |
|---|---|
| Swatch | The material’s colour. Click it to change the colour: everything that uses the material follows, and so does the solved 3D preview. A dashed swatch means no colour yet; click it to give one. |
| Name | The material, and under it what uses it, for example Main or Reinf 1. |
| Colour name | The name of the colour, as the material pickers show it. Empty until the material has a colour. |
A colour can change only while the Atlas is loaded, and not while a nest is being calculated.
The status bar
Section titled “The status bar”
The line at the foot of the panel reports the last action, for example “Frame connectivity on” or “Select a wireframe in the viewport to solve”. Errors are red. A long message is cut short.
Debug copies technical details to the clipboard for a support request: details of the last runs, the server address, the start and end of your access key, and a summary of the geometry. Report a problem… sends the same and more, so use that first.
The FAB3D chip
Section titled “The FAB3D chip”Close panel in the account menu, or the panel window’s minimise button, parks the panel on a small chip labelled FAB3D. Click the chip to bring the panel back at its size and place. Drag the chip to move it.
In Fabricator 1
Section titled “In Fabricator 1”The Fabricator 1 panel has the same account row without the Atlas button, Notch where Fabricator 2 has Cutout, no Import Drawn Panels and no Materials list. Its 3D Solver section adds Rendering, Exclude panels and Notches, and it has a 2D Output section. See Coming from Fabricator 1.