
A tour of the screen
Two windows do the work: the Fabricator panel beside the Rhino viewport, and the Atlas. Every button in both has hover text. Rest the pointer on one to see what it does.
The Fabricator panel
Section titled “The Fabricator panel”Type Fabricator to open it. The top half is the 3D Frame section: the tools
for drawing the wireframe.
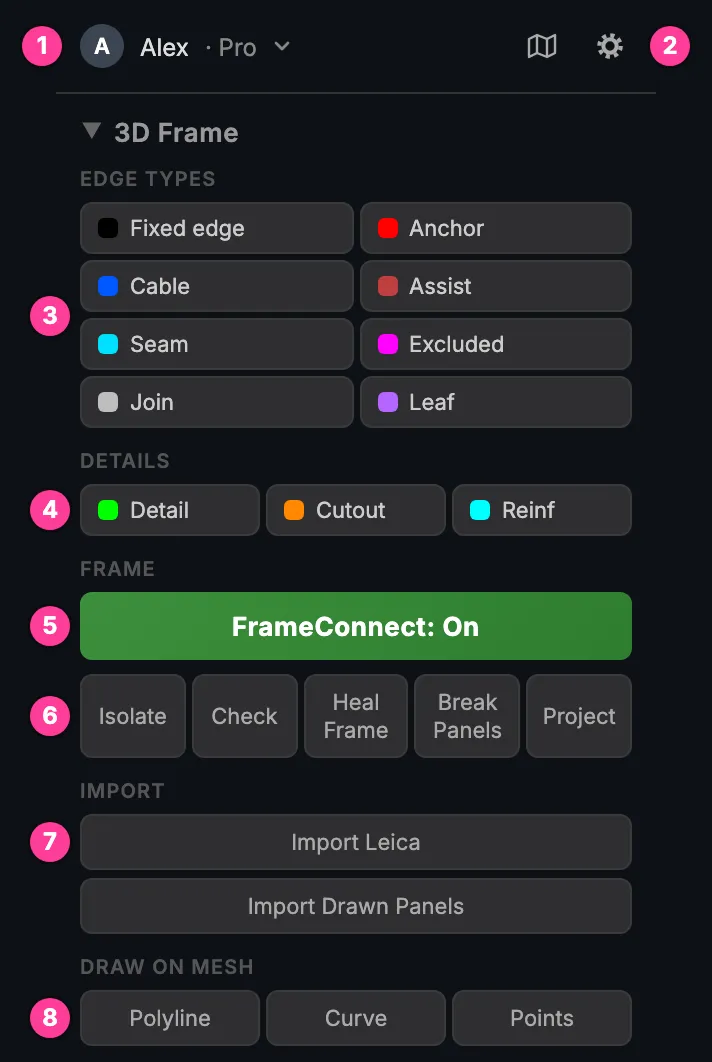
- Account. Your name and plan. Click it for the account menu. The map button beside it opens the Atlas.
- Settings. Seam and pocket types, materials, units, output layers and colours, and the Fabricator 1 / Fabricator 2 switch.
- Edge Types. The roles an edge can have. Select curves and click a type to put them on that layer. With nothing selected, a click starts drawing on it.
- Details. Detail, Cutout and Reinf: lines you draw on the solved 3D mesh, or curves you put on those layers.
- FrameConnect. Curves snapped onto each other stay connected while you edit the frame. Green is on. Leave it on.
- Frame tools. Isolate, Check, Heal Frame, Break Panels and Project.
- Import. A Leica file, or panels drawn in other software.
- Draw on Mesh. Polylines, curves and points drawn on the solved 3D mesh.
The bottom half is the 3D Solver, the action buttons and the Materials list.
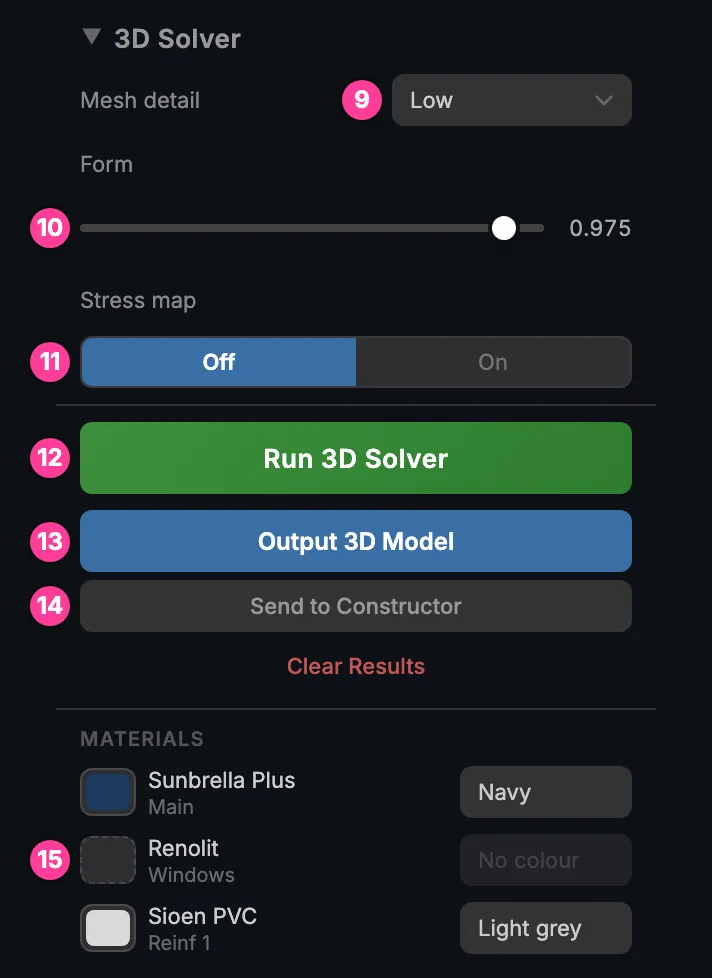
- Mesh detail. How fine the solved mesh is, from Very low to Production. Finer takes longer.
- Form. How much shape the solver gives the fabric between its edges, 0.600 to 1.000. The default is 0.975.
- Stress map. Colours the 3D preview by fabric stress. Linked to Stress in the Atlas.
- Run 3D Solver. Solves the wireframes selected in the viewport. A drawing with one wireframe needs no selection.
- Output 3D Model. Puts the solved 3D mesh into the document.
- Send to Constructor, Clear Results. Clear Results removes the 3D preview and the solver results; your frame is not changed.
- Materials. The materials used in the Atlas, with their colours. Click a colour to change it.
Every control is listed in The Fabricator panel.
The Atlas
Section titled “The Atlas”Click the FAB2D chip that floats over Rhino, or the map button at the top of the panel, to open the Atlas. It works best full screen on a second monitor.
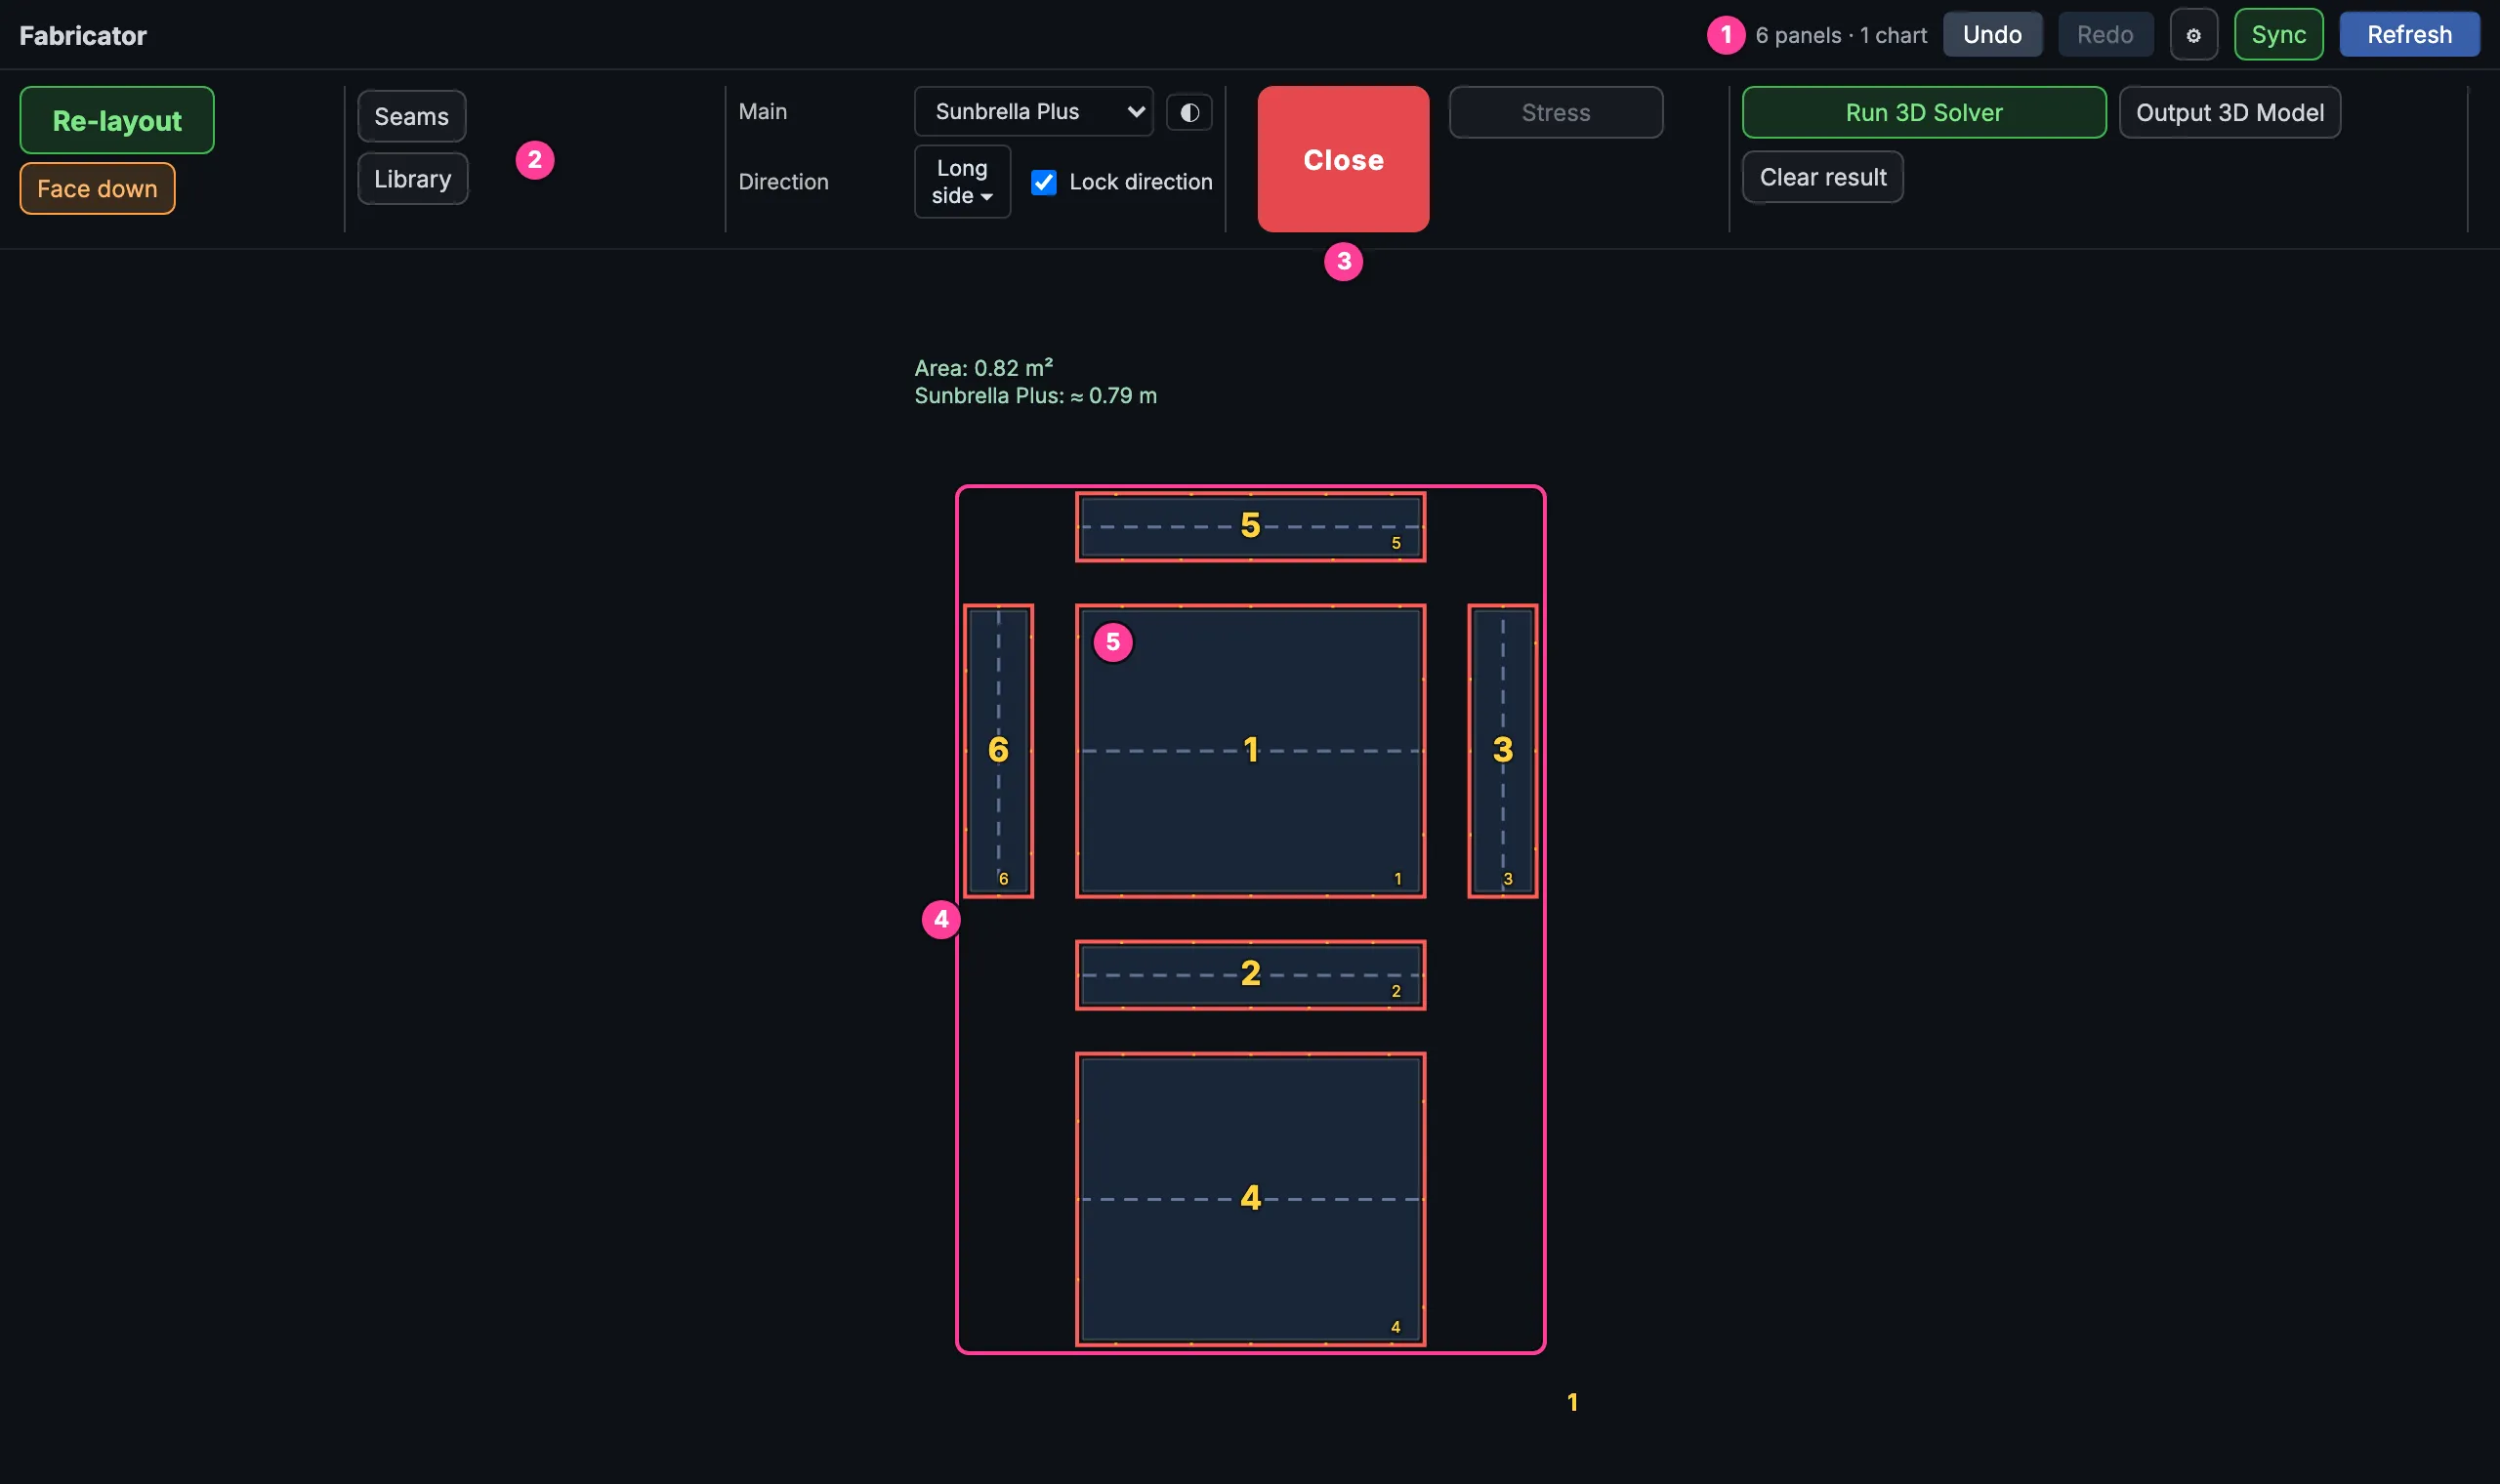
- Header. How many panels there are, then Undo, Redo, Settings (the cog), Sync and Refresh.
- Toolbar. Five columns: Layout, Fabrication, Materials, Show and Output. Rest the pointer on a column and the rest of its tools drop down.
- Close. Parks the Atlas on the FAB2D chip. Opening it again continues where you were.
- The map. Every panel laid flat. The panels of one wireframe sit together on a card, with the estimate above it.
- A panel. The big number is the panel number. The outer line is the cut line; the inner line is the edge you drew.
Moving around the Atlas
Section titled “Moving around the Atlas”| To | Do this |
|---|---|
| Zoom | Roll the mouse wheel. The view zooms around the pointer. |
| Pan | Drag with the right or the middle mouse button, or hold Space and drag. |
| Select | Click a panel. Drag on an empty part of the map to select several. |
| Move and turn | Drag a panel to move it. Drag the round handle of the selection to turn it; hold Shift to snap to 15°. |
| Undo, Redo | Ctrl+Z and Ctrl+Y, or Undo and Redo in the header. |
| Put a tool down | Esc. A right-click with no tool on and nothing selected picks the last tool up again. |
All the keys are in Keys and mouse.
The toolbar, column by column
Section titled “The toolbar, column by column”Each column has a top row that is always there, and more tools that drop down when the pointer rests on the column.
| Column | What it is for |
|---|---|
| Layout | How the panels are arranged on the page (Re-layout), and which side of the material you look at (Face up / Face down). |
| Fabrication | How the pieces are cut and sewn: Seams, Library, and in the drop-down Split, Join, Notch, Corners, Reinf, Cutout, Detail, Pocket and more. |
| Materials | The Main material, its Direction, and the materials of the reinforcements. |
| Show | What is drawn on the map and in the Rhino viewport: Stress, panel numbers, the estimate. These change the view, not the project. |
| Output | Run 3D Solver, Output 3D Model, Clear result, and in the drop-down Output 2D patterns, Nest and their settings. |
Between Materials and Show is the red Close button. Every control of every column is in The Atlas.
In the header
Section titled “In the header”| Button | What it does |
|---|---|
| Sync | Calculates the map and the fabrication again from scratch. |
| Refresh | Reads the drawing from Rhino again. Use it if the Atlas and Rhino seem out of step. |
| ⚙ | Opens Settings. |